A trap tunnel is a wooden box designed to protect your tamariki and pets from the trap inside.
Materials and equipment
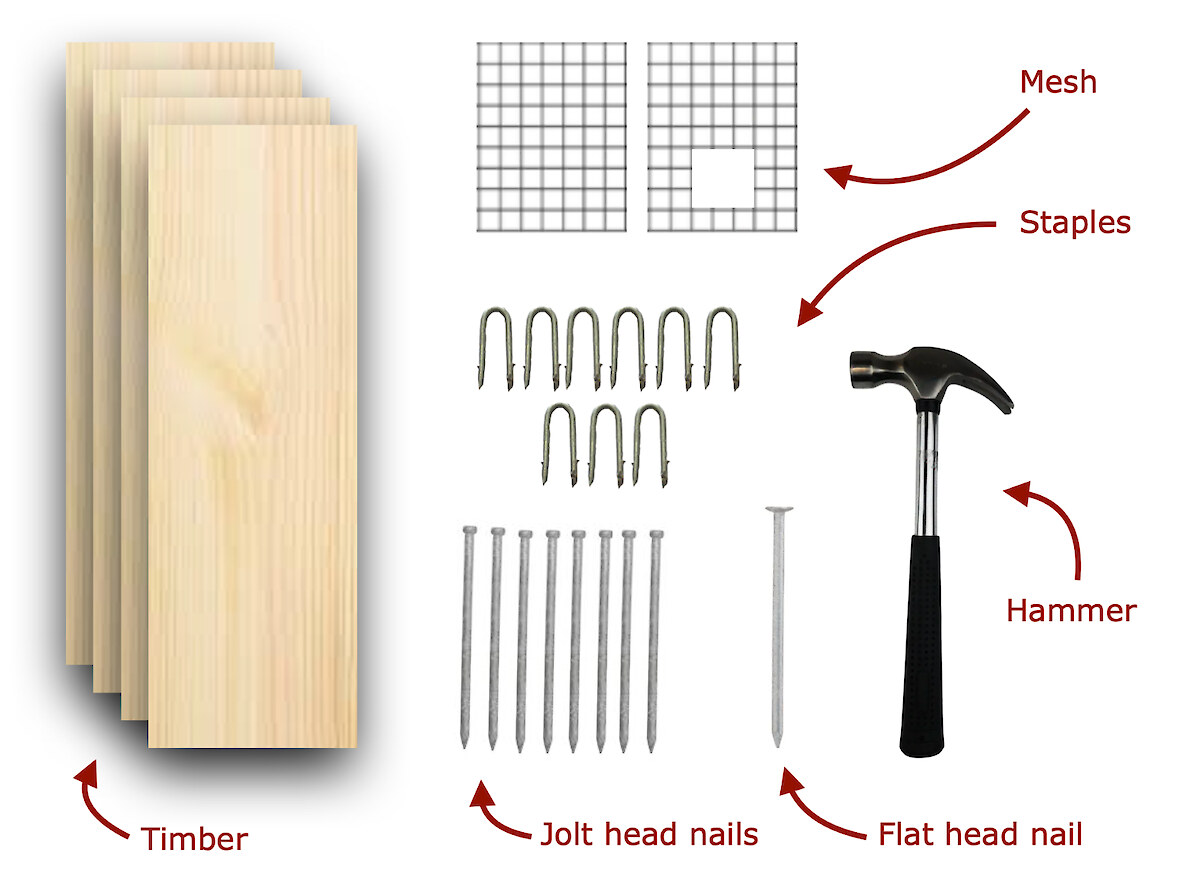
4 x fencing timber (150mm x 25mm x 500mm)
10 x 60mm jolt head nails
1 x 75mm flat head nail
9 x staples (19 x 2mm)
1 x front mesh screen (mesh size: 19mm2) w/ opening
1 x back mesh screen (mesh size: 19mm2)
Step 1 – fasten base to the sides

Hammer in a 60mm jolt head nail in each corner of the base piece through to the walls. It helps to pre-drill these holes. This is a bit fiddly to hold the pieces in the correct position, so you may need some help for this. Tip: to help fasten the first three sides, we recommend resting the wood on a block of four pieces of timber screwed together.
Step 2 – nail the lid on
Flip the base over (pic 1) and nail in each corner (2). Use a nail in the centre of the sides of either the top or bottom piece for added strength.
Step 3 – staple on the front mesh
With a staplegun, staple the front piece of mesh to the tunnel. Ensure the entrance hole is level with the top of the base. Fold or file back the sharp edges on the mesh hole entrance.
Step 4 – staple on the back mesh
Hammer a staple vertically on each corner of the bottom wire – the mesh should have room to hinge like a door.
Hammer the final staple in the centre of the top piece of wood just above the top wire of the mesh. A flat head nail should be able to slide through the staple without being too loose. The nail holds the door closed – congrats, your tunnel is ready!
Step 5 – quality check
Check that:
- Mesh around the tunnel entrance is trimmed and flush
- Entrance hole is level with the base piece
- Flat head nail can easily slide in and out of the top curved staple and that the door can open easily
- Wooden sides are attached securely without nails sticking out
Step 6 – get trapping
See our ‘How to get trapping’ guide to learn more. Happy trapping!